DESTILLIERMEISTER JUNIOR-WD42
42 l stainless steel still with pressurized water bath, 2 columns and high-performance cooling for the production of brandy
High Quality:
-
Solid thick-walled boiler for the water bath
-
with pressure measurement and safety valves,
-
made of 18/10 stainless steel with three-layered thermo bottom
Equipment and dimensions
-
Water bath boiler with safety system for the pressurized water bath: 25 liters
-
Mash-water boilers: 20.5 Litres,
-
2 Columns / combustion-chamber extensions: 12 Litres,
-
Dephlegmator,
-
Inner Diameter 32 cm,
-
Total height approx. 170 cm.
-
Powerful counterflow cooler with 6 m jacket length. In this cooler, a thinner pipe (core) passes through a jacket pipe. Through the soul flows the distillate. Between soul and coat cooling water is passed in countercurrent. Due to the spiral-shaped water flow, the flow between soul and mantle is turbulent even at low flow velocities. This causes effective heat transfer from the distillate to the cooling water. Because of this and because of the comfortable length of the radiator, only moderate cooling water is needed.
Der Wasserbadkessel
-
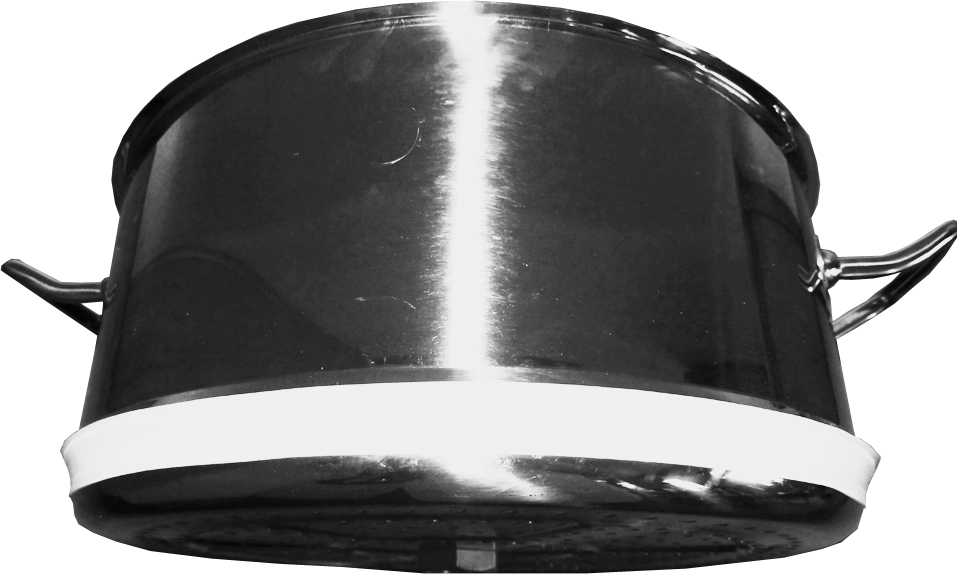
Water Bath Vessel
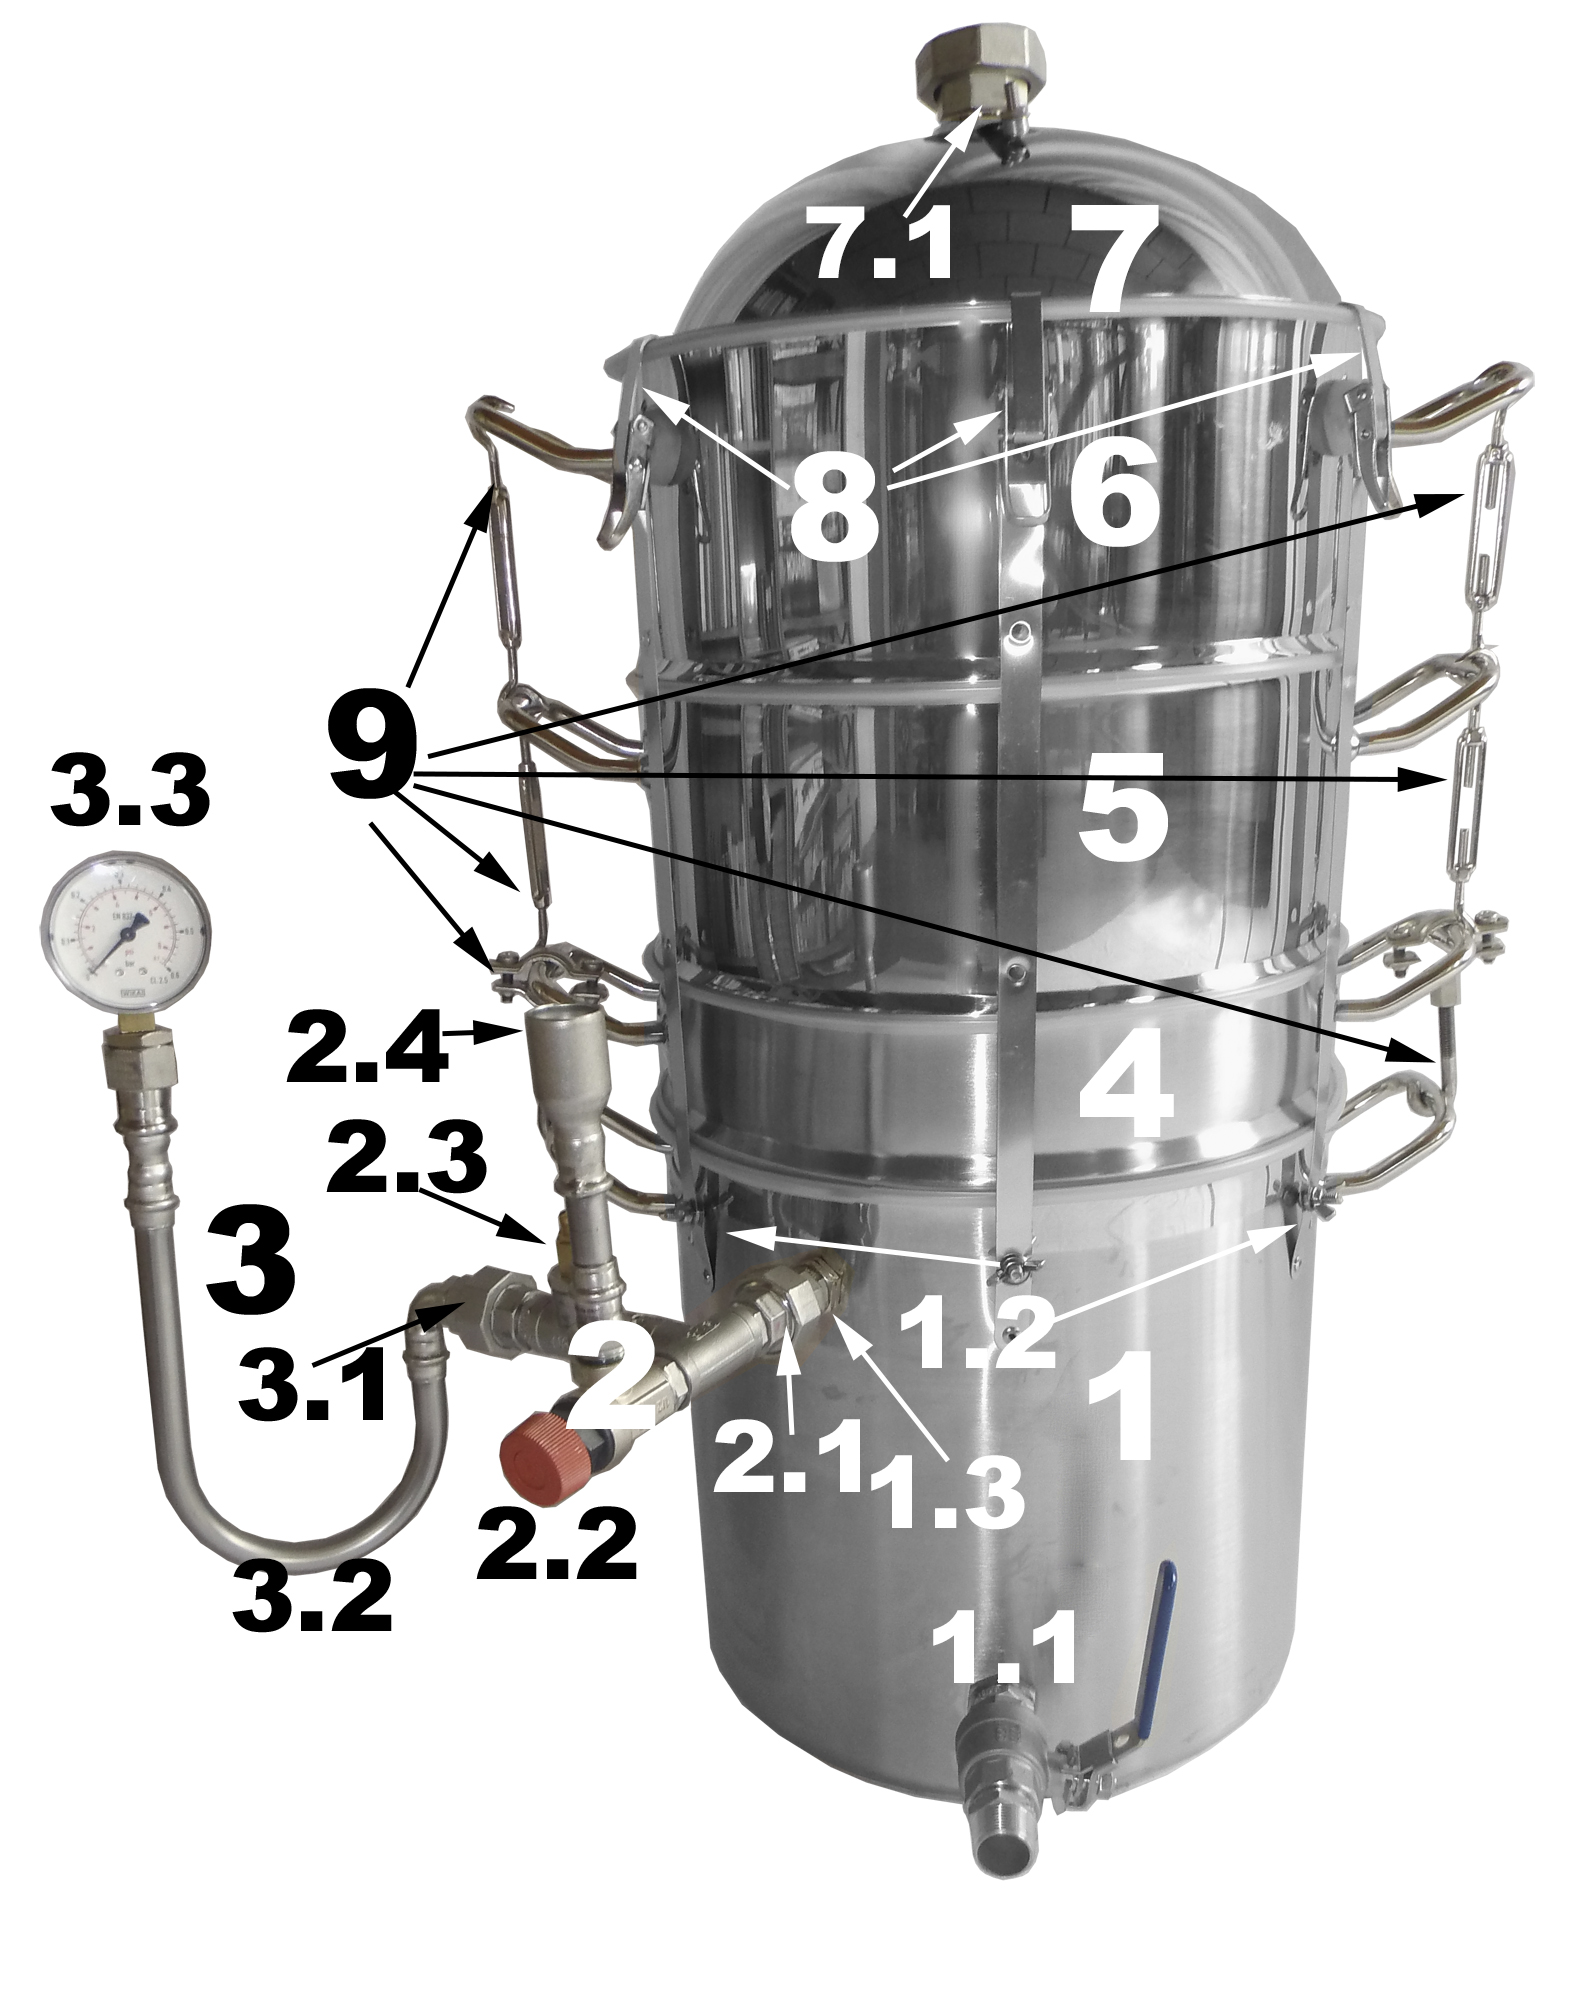
This is filled for operation with 9 liters, distilled as much water. On delivery, the boiler is assembled with the mash kettle 4 and no longer has to be disassembled for operation. The filling can be done via the ball valve of the water pot. For this, the screw 1.3 must be open. After operating the boiler, the boiler pressure is released via the red wheel 2.3 and the safety / manometer module 2- / 3 dismantled and 1.2 closed with the plug 15.1. The mash kettle 4 can then be emptied and refilled without having to worry about the water bath water. For operation, modules 2 and 3 are reassembled.
-
Screw nipple for fastening the clamping locks 8.
-
Screw connection for the safety module.
-
-
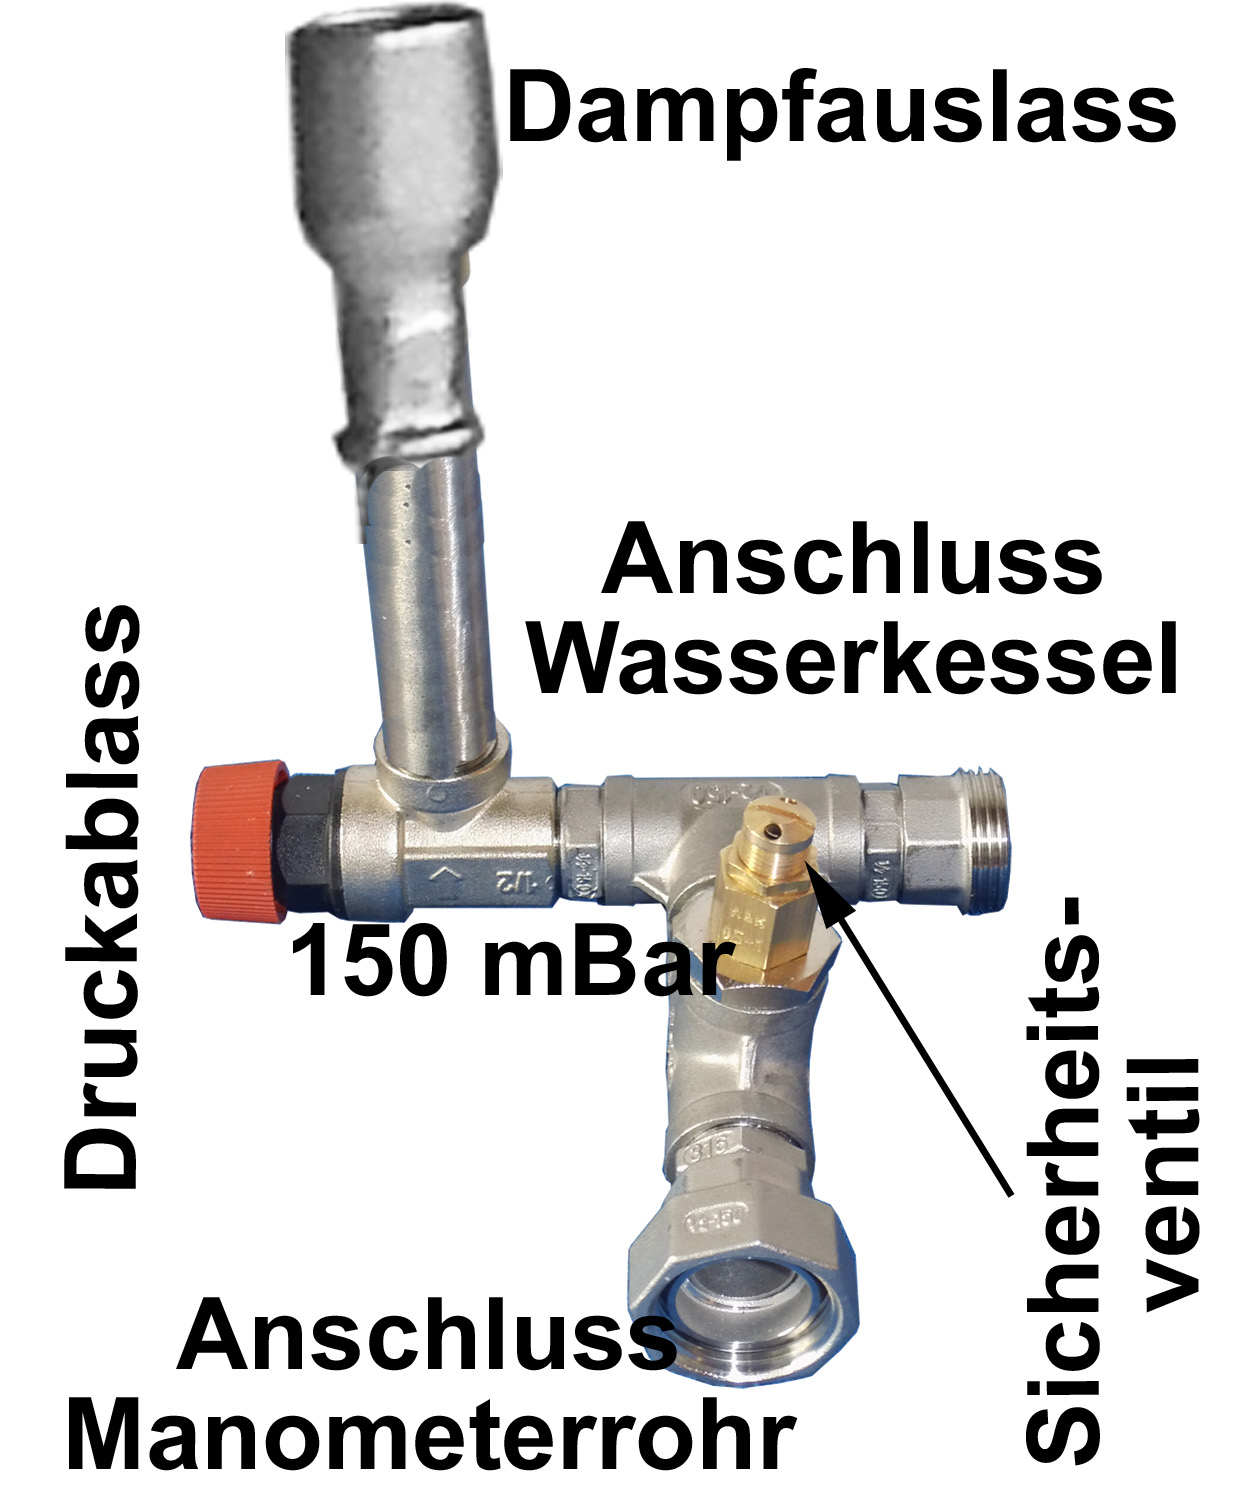
Securety Module
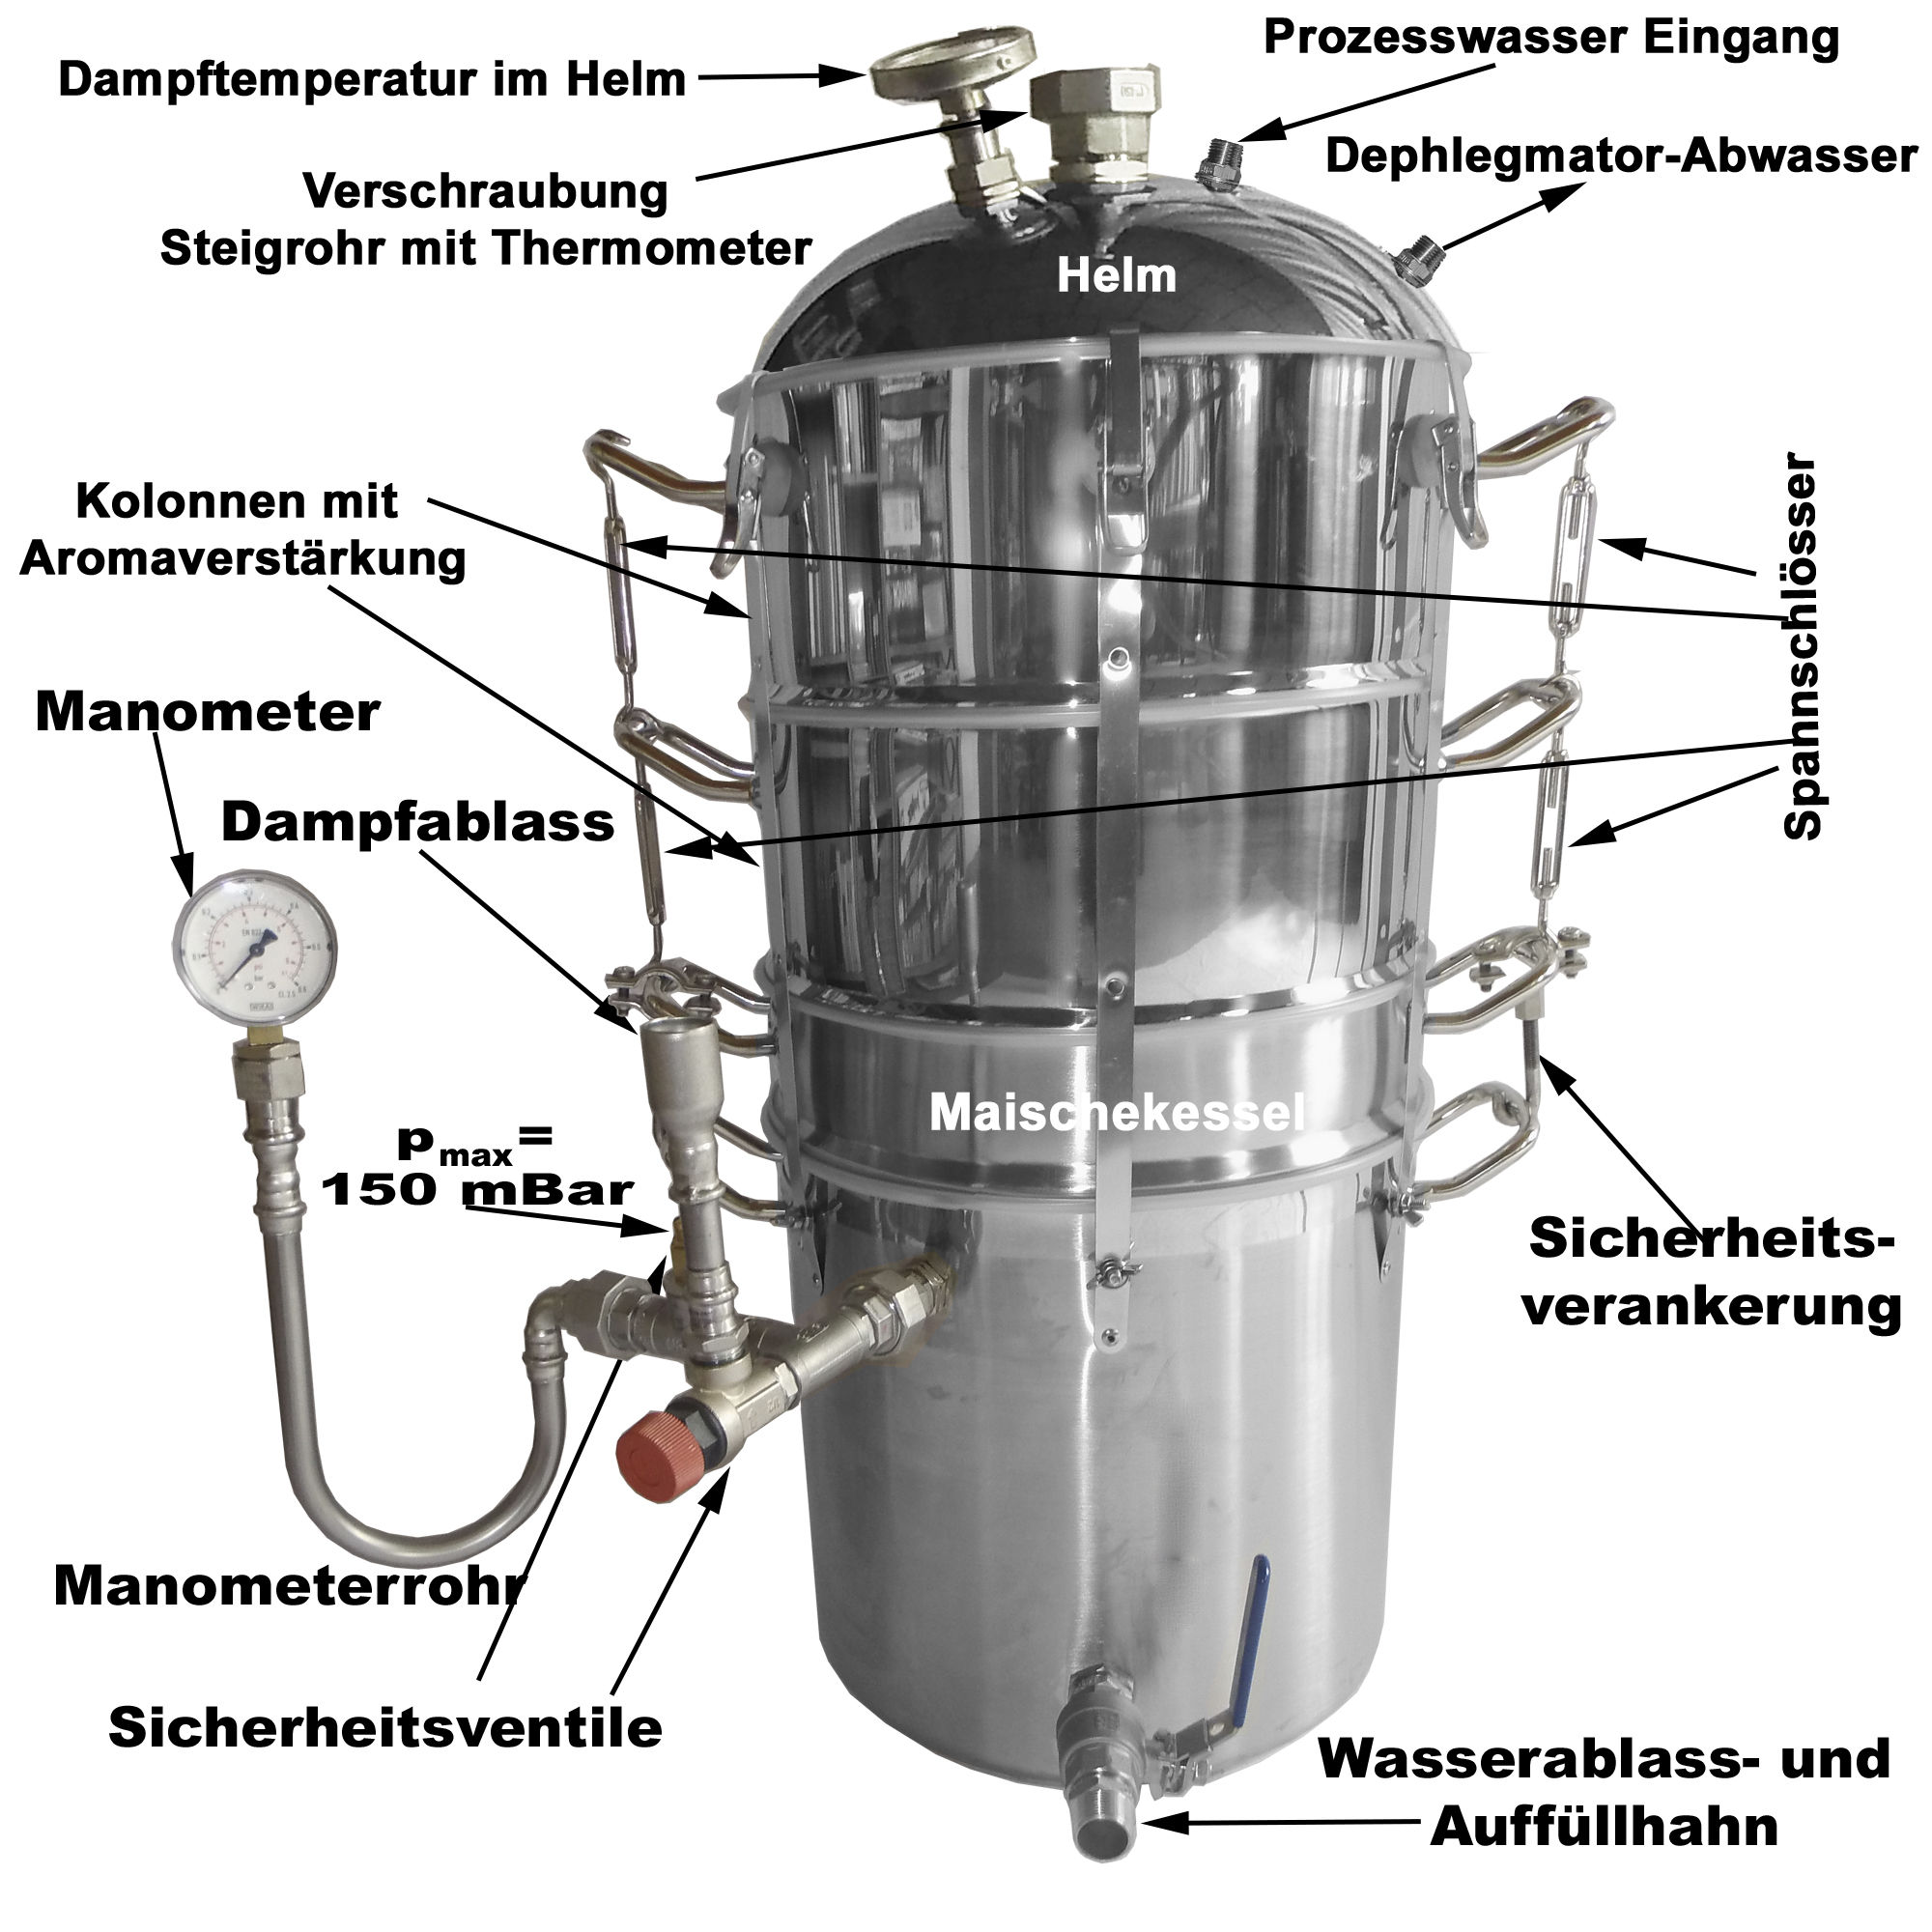
The water bath system may only be used when fully closed. Ie. all fasteners are closed. This limits the boiler pressure to up to 150 mbar. For the operation of the still, the boiler pressure should already be reduced from 150 mBar, which is sufficient for the distillation process. The safety valve 2.4 opens from 150 mbar and releases pressure. If the heating power is too high, it can sometimes rise to 200 mbar. In this case you should reduce the heating to get back below 100 mBar. The boiler was tested up to a pressure of 500 mbar. However, too high pressures cause the distillation to run too vigorously, so that higher pressures are counterproductive.-
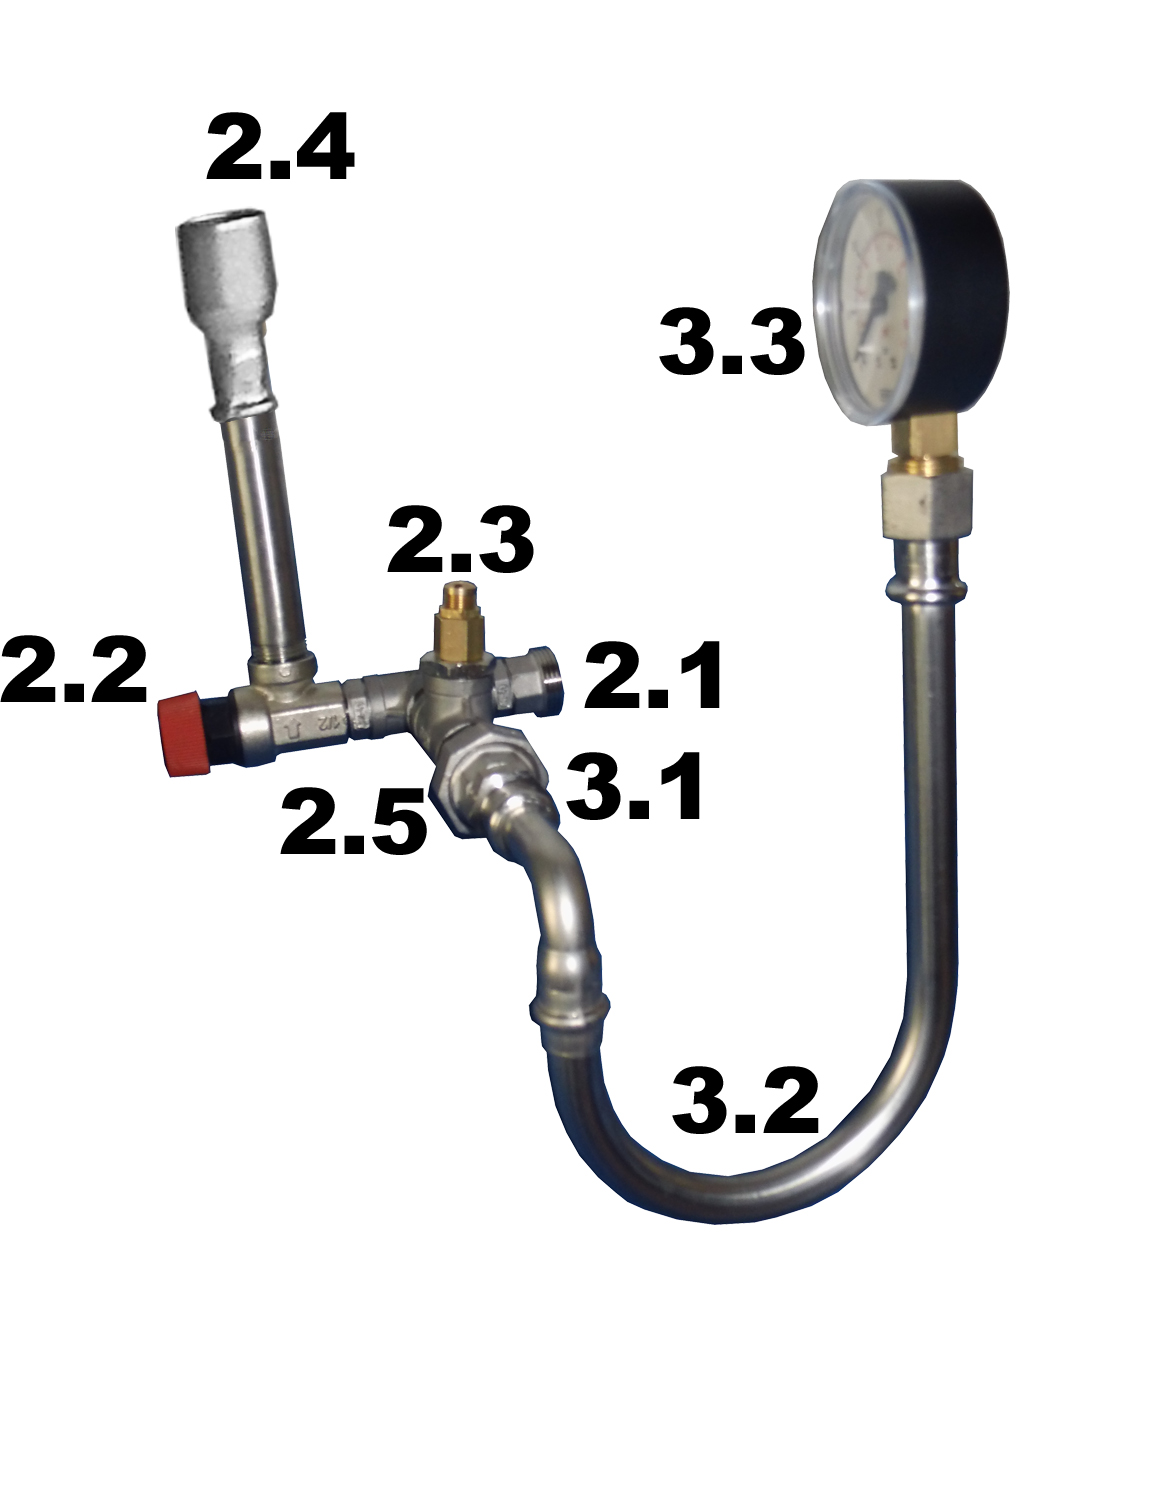
Nipple for the screw connection to 1.2.
-
Steam outlet for pressure relief via 2.3.
-
Safety valve 1.5 bar. By turning the red wheel the pressure is taken from the boiler. This valve opens automatically from 1.5 bar, if the valve 2.4 fails in the unlikely event and is therefore also an additional safety level.
-
Safety valve that opens at a maximum of 150 mbar and releases pressure. The setting of this valve should not be changed unless you know what you are doing. The raising of the valve is prevented by a blocking agent. The blockade can only be lifted by force.
-
Connection fitting for the pressure gauge module.
-
-
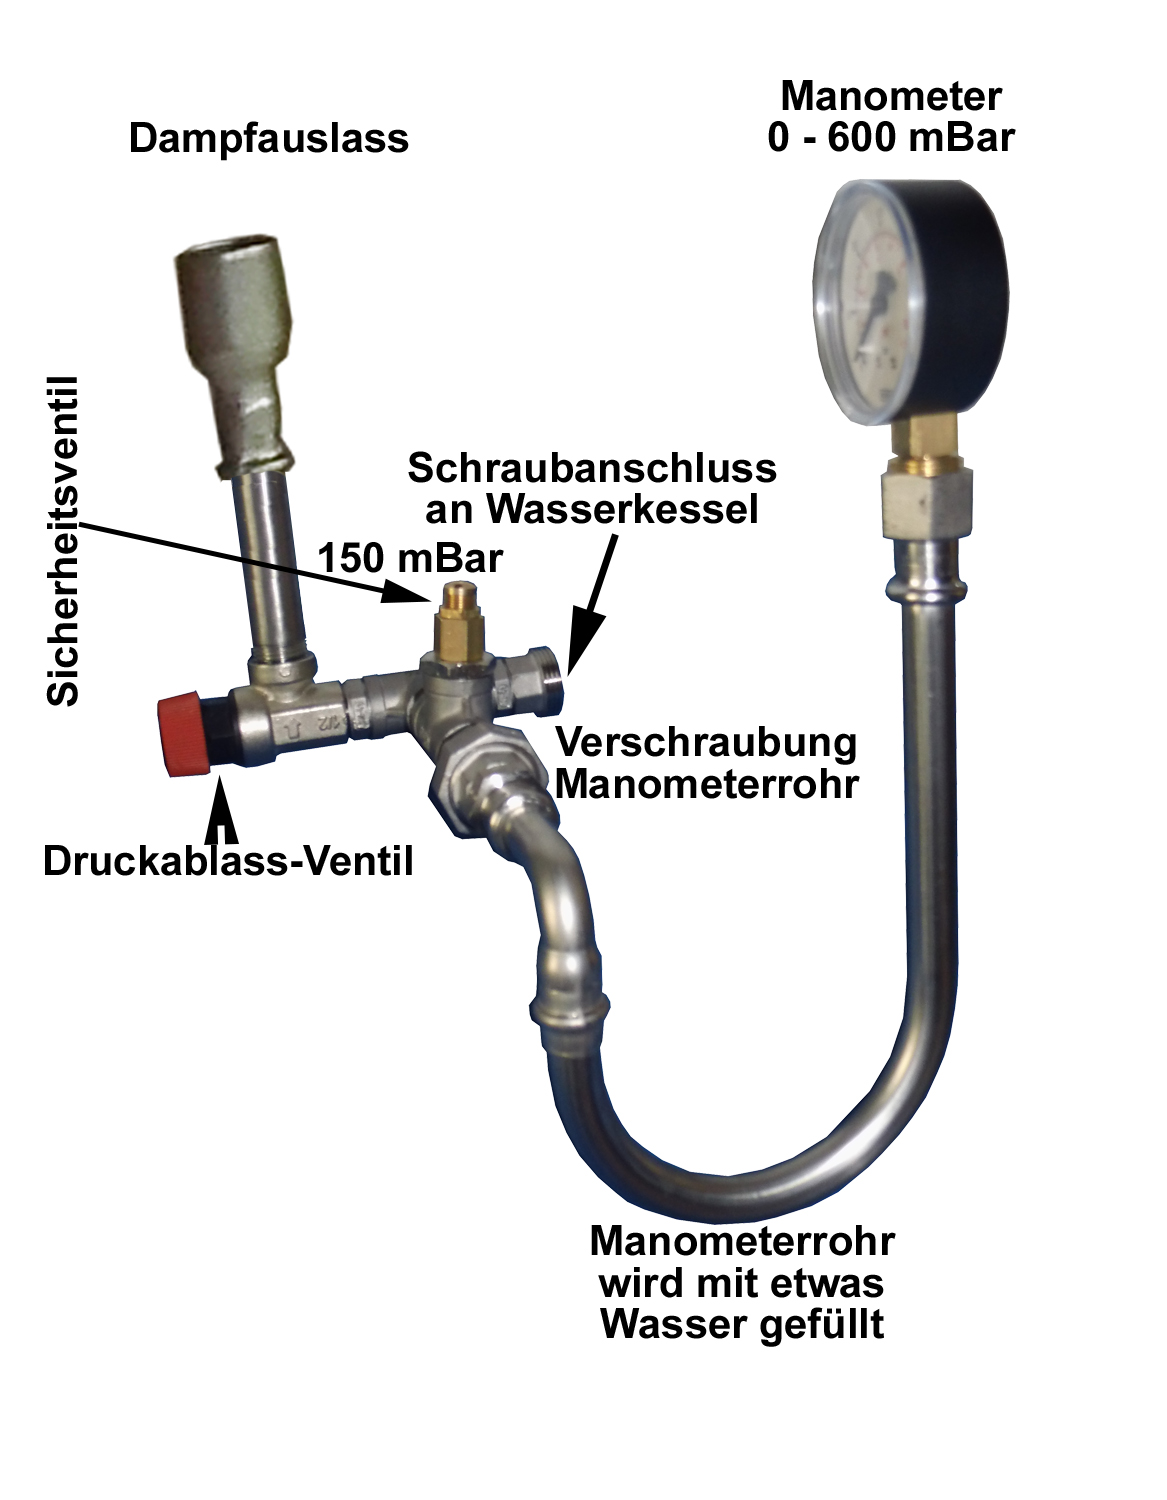
Manometer-Modul
-
Connection nipple for screwing to 2.5.Manometer tube. This serves to protect the manometer from high temperatures. It is filled with water for operation.
-
Manometer. This serves to protect the manometer from high temperatures. It is filled with water for operation.
-
Pressure gauge up to 600 mbar.
-
-
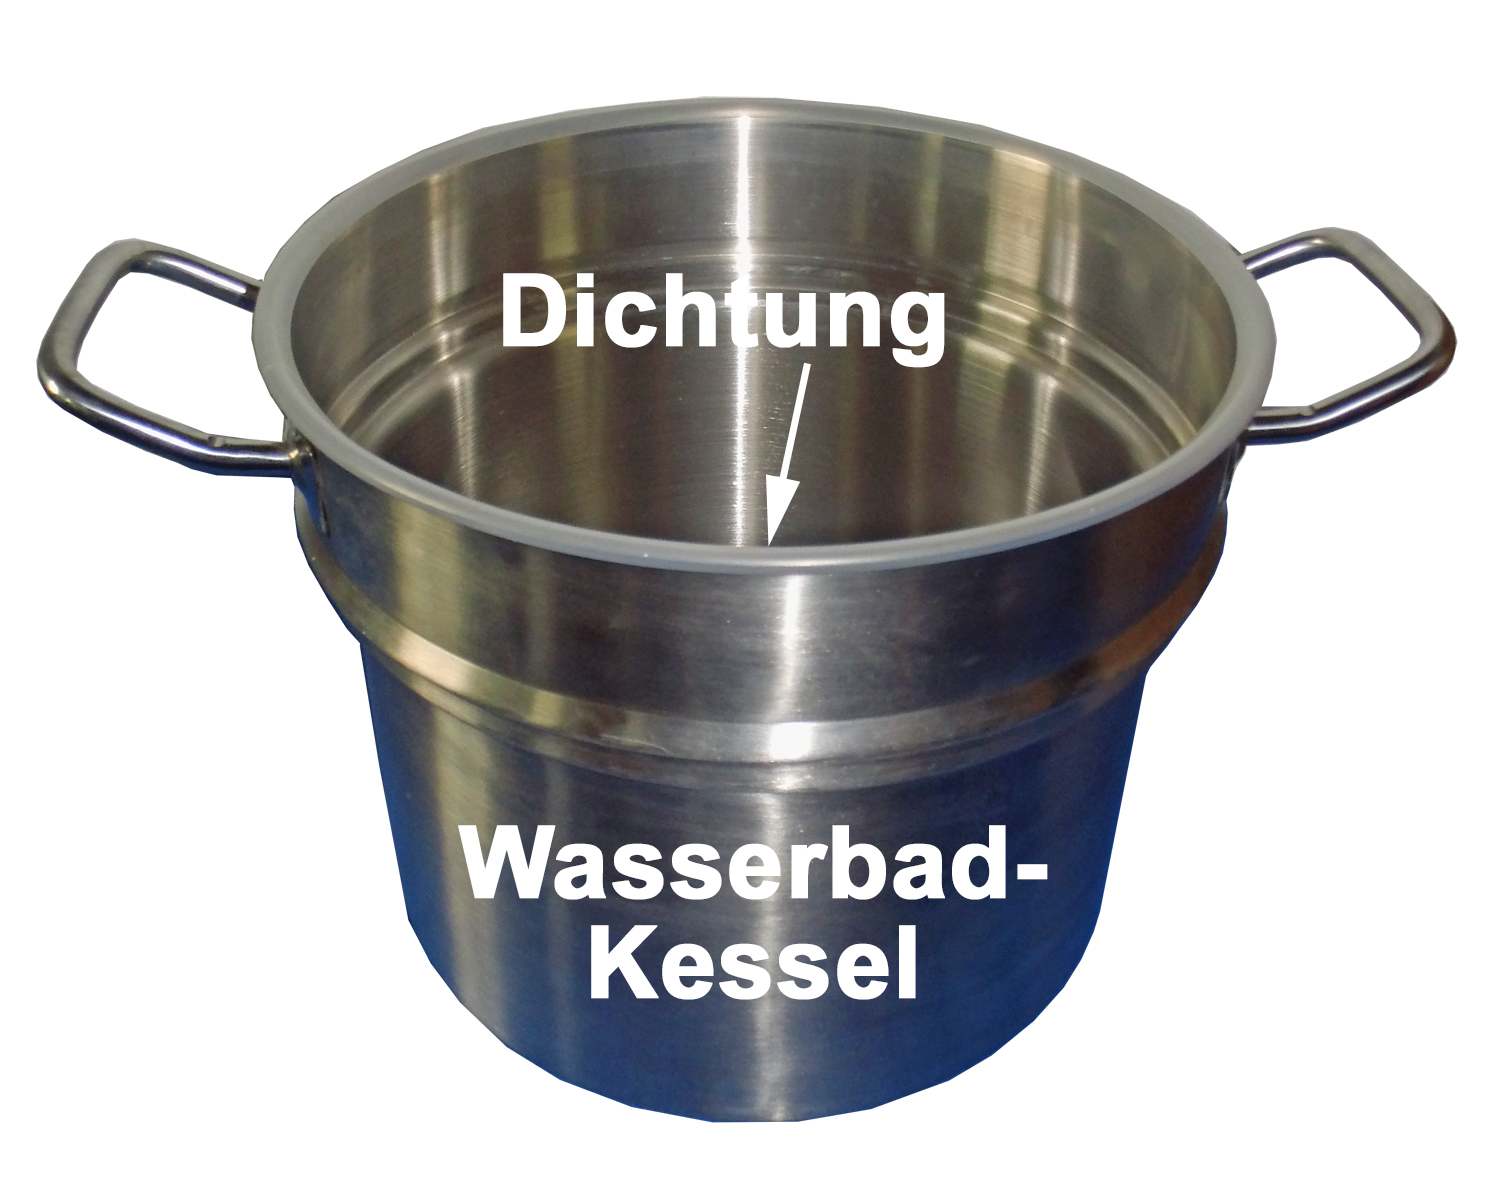
20,5 Litre Waterbath-Mash Vessel
This is tightly connected to the kettle at delivery. There is no need to uninstall this, unless you want to fill the kettle 1 directly with non-fouling substances. When reassembling the water bath, it must be ensured that the mash kettle is pressed firmly into position 1 and the system is secured with 2 matching clamping locks. It is sufficient, however, to fill the waterbath with 9 liters of distilled water and, after use, firmly close it with the supplied screw plug. As steam escapes through the safety valve during use, it is sometimes necessary to refill the water bath.
-
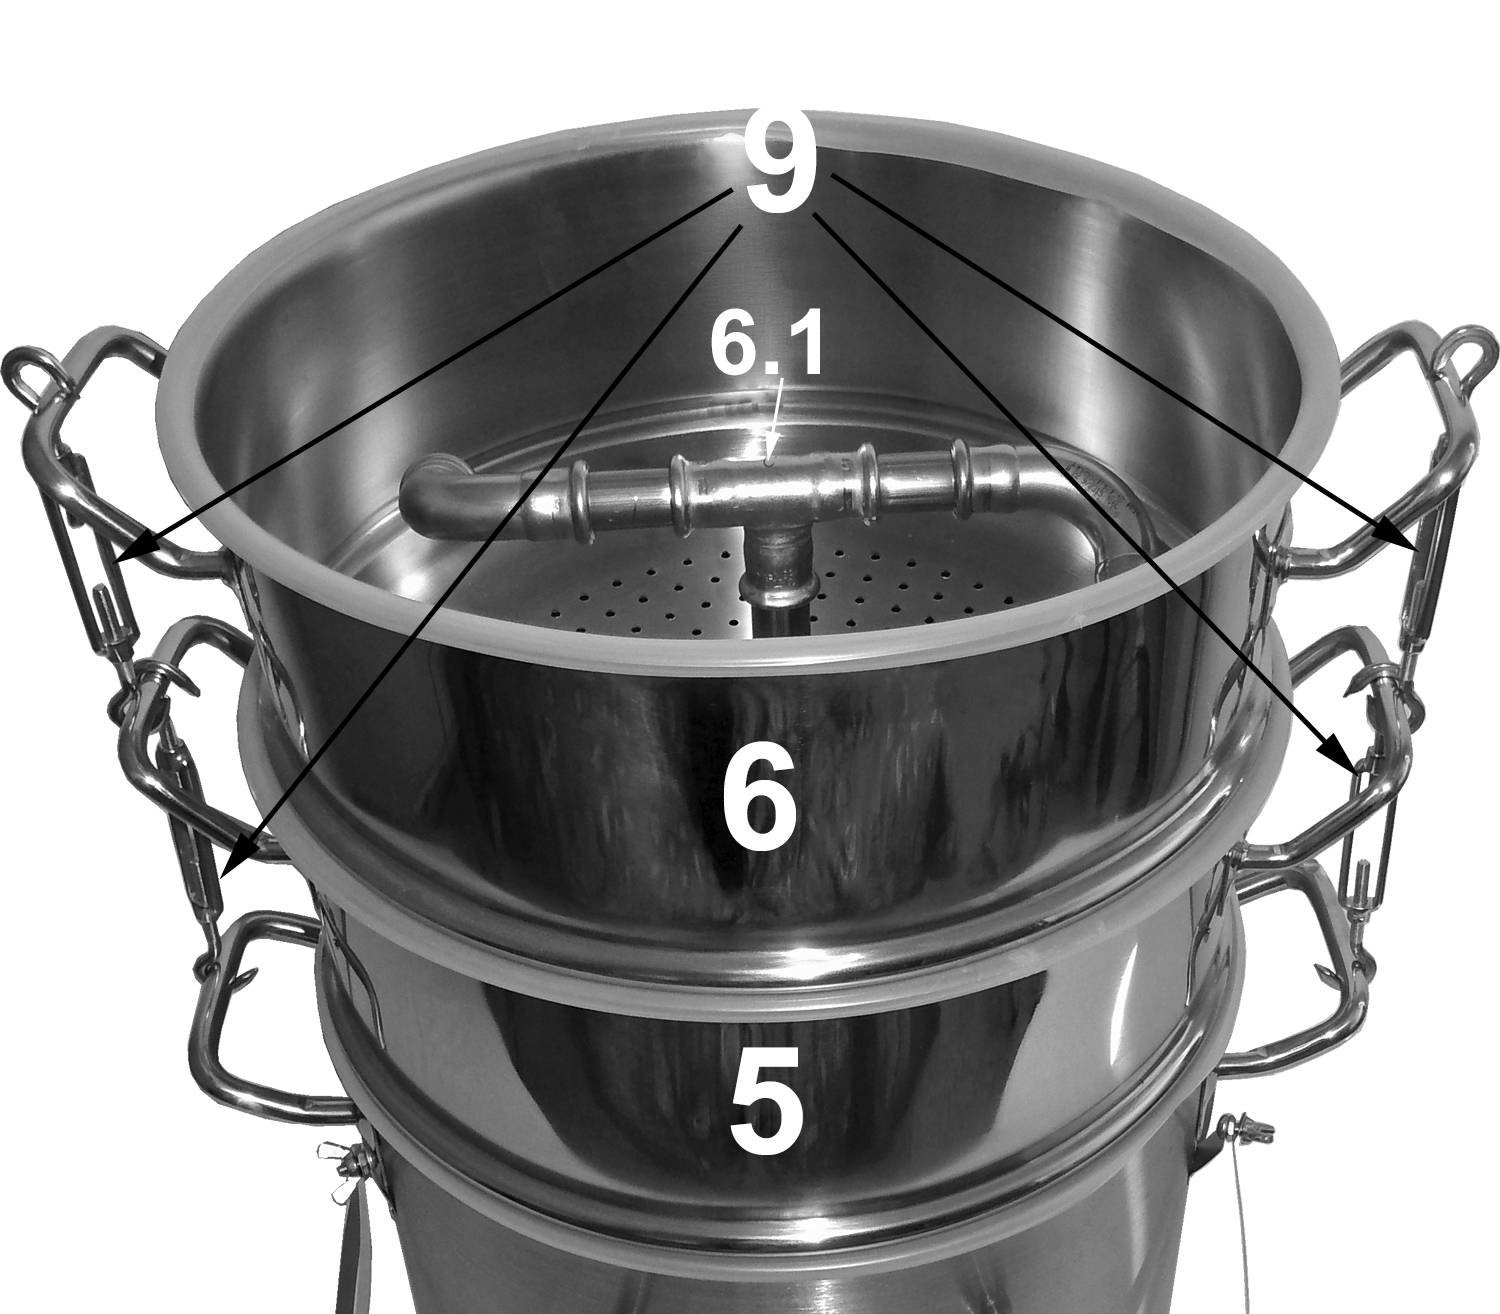
First column, 12 liters volume, which can be filled with mash to distillate.
-
Aroma enhancement by vapor bridges in the columns. Due to the steam bridges, the fine steam rises and initially swirls in the columns. The more volatile constituents continue to rise, the heavier ones condense again and drop back over the sieve plate. Thus, there is a dynamic multiple distillation in the columns.
-
-
Second column, 12 liters volume, which can be also filled with mash to distillate.
-
Aroma enhancement as above.
-
-
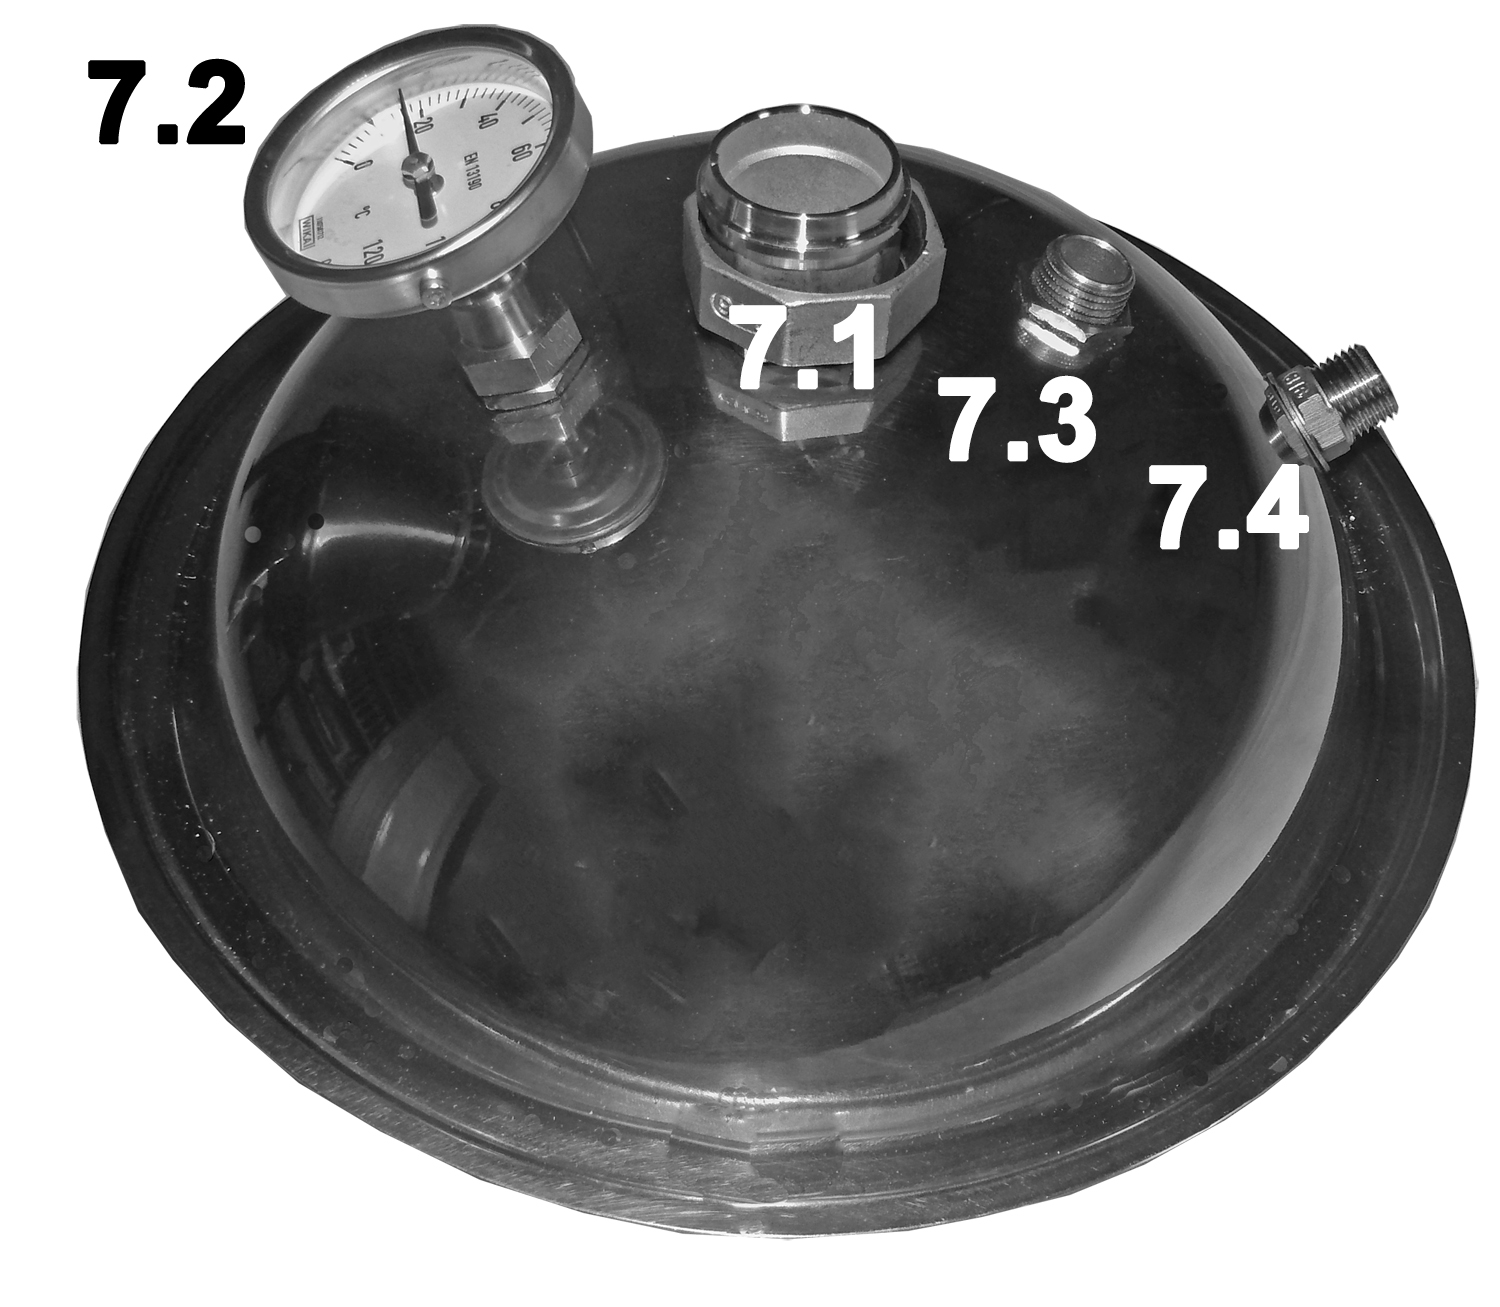
Distiller helmet with built-in dephlegmator
-
with screw connection for mounting the module (8).
-
Stainless steel analogue thermometer of high quality for the measurement of the distillation temperature. The thermometer has the accuracy class 1.
-
To derive the used water 7.3 is connected via the hose 8.2 with the process water module 7 to 7.5 and derived over 7.6 and one of the hoses 8.4. With the pinch cock on hose 8.1, the dephlegmator inflow can be regulated. He should never be completely pinched; It is recommended that the control over the cooling water inflow with a fine control valve to accomplish.
-
-
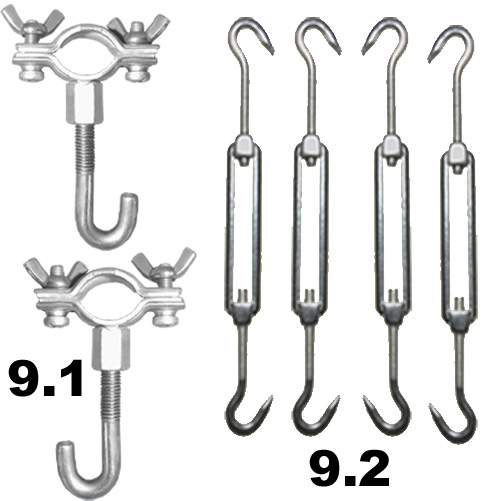
6 adjustable Tension Locks
These are attached to the screw nipples 1.2 and fastened by means of the thumbscrews.

-
Fuse Locks
-
Safety Hooks to tighten the Waterboioler and the Mash Vessel
-
4 Turnbuckles for securing the columns.
-
-
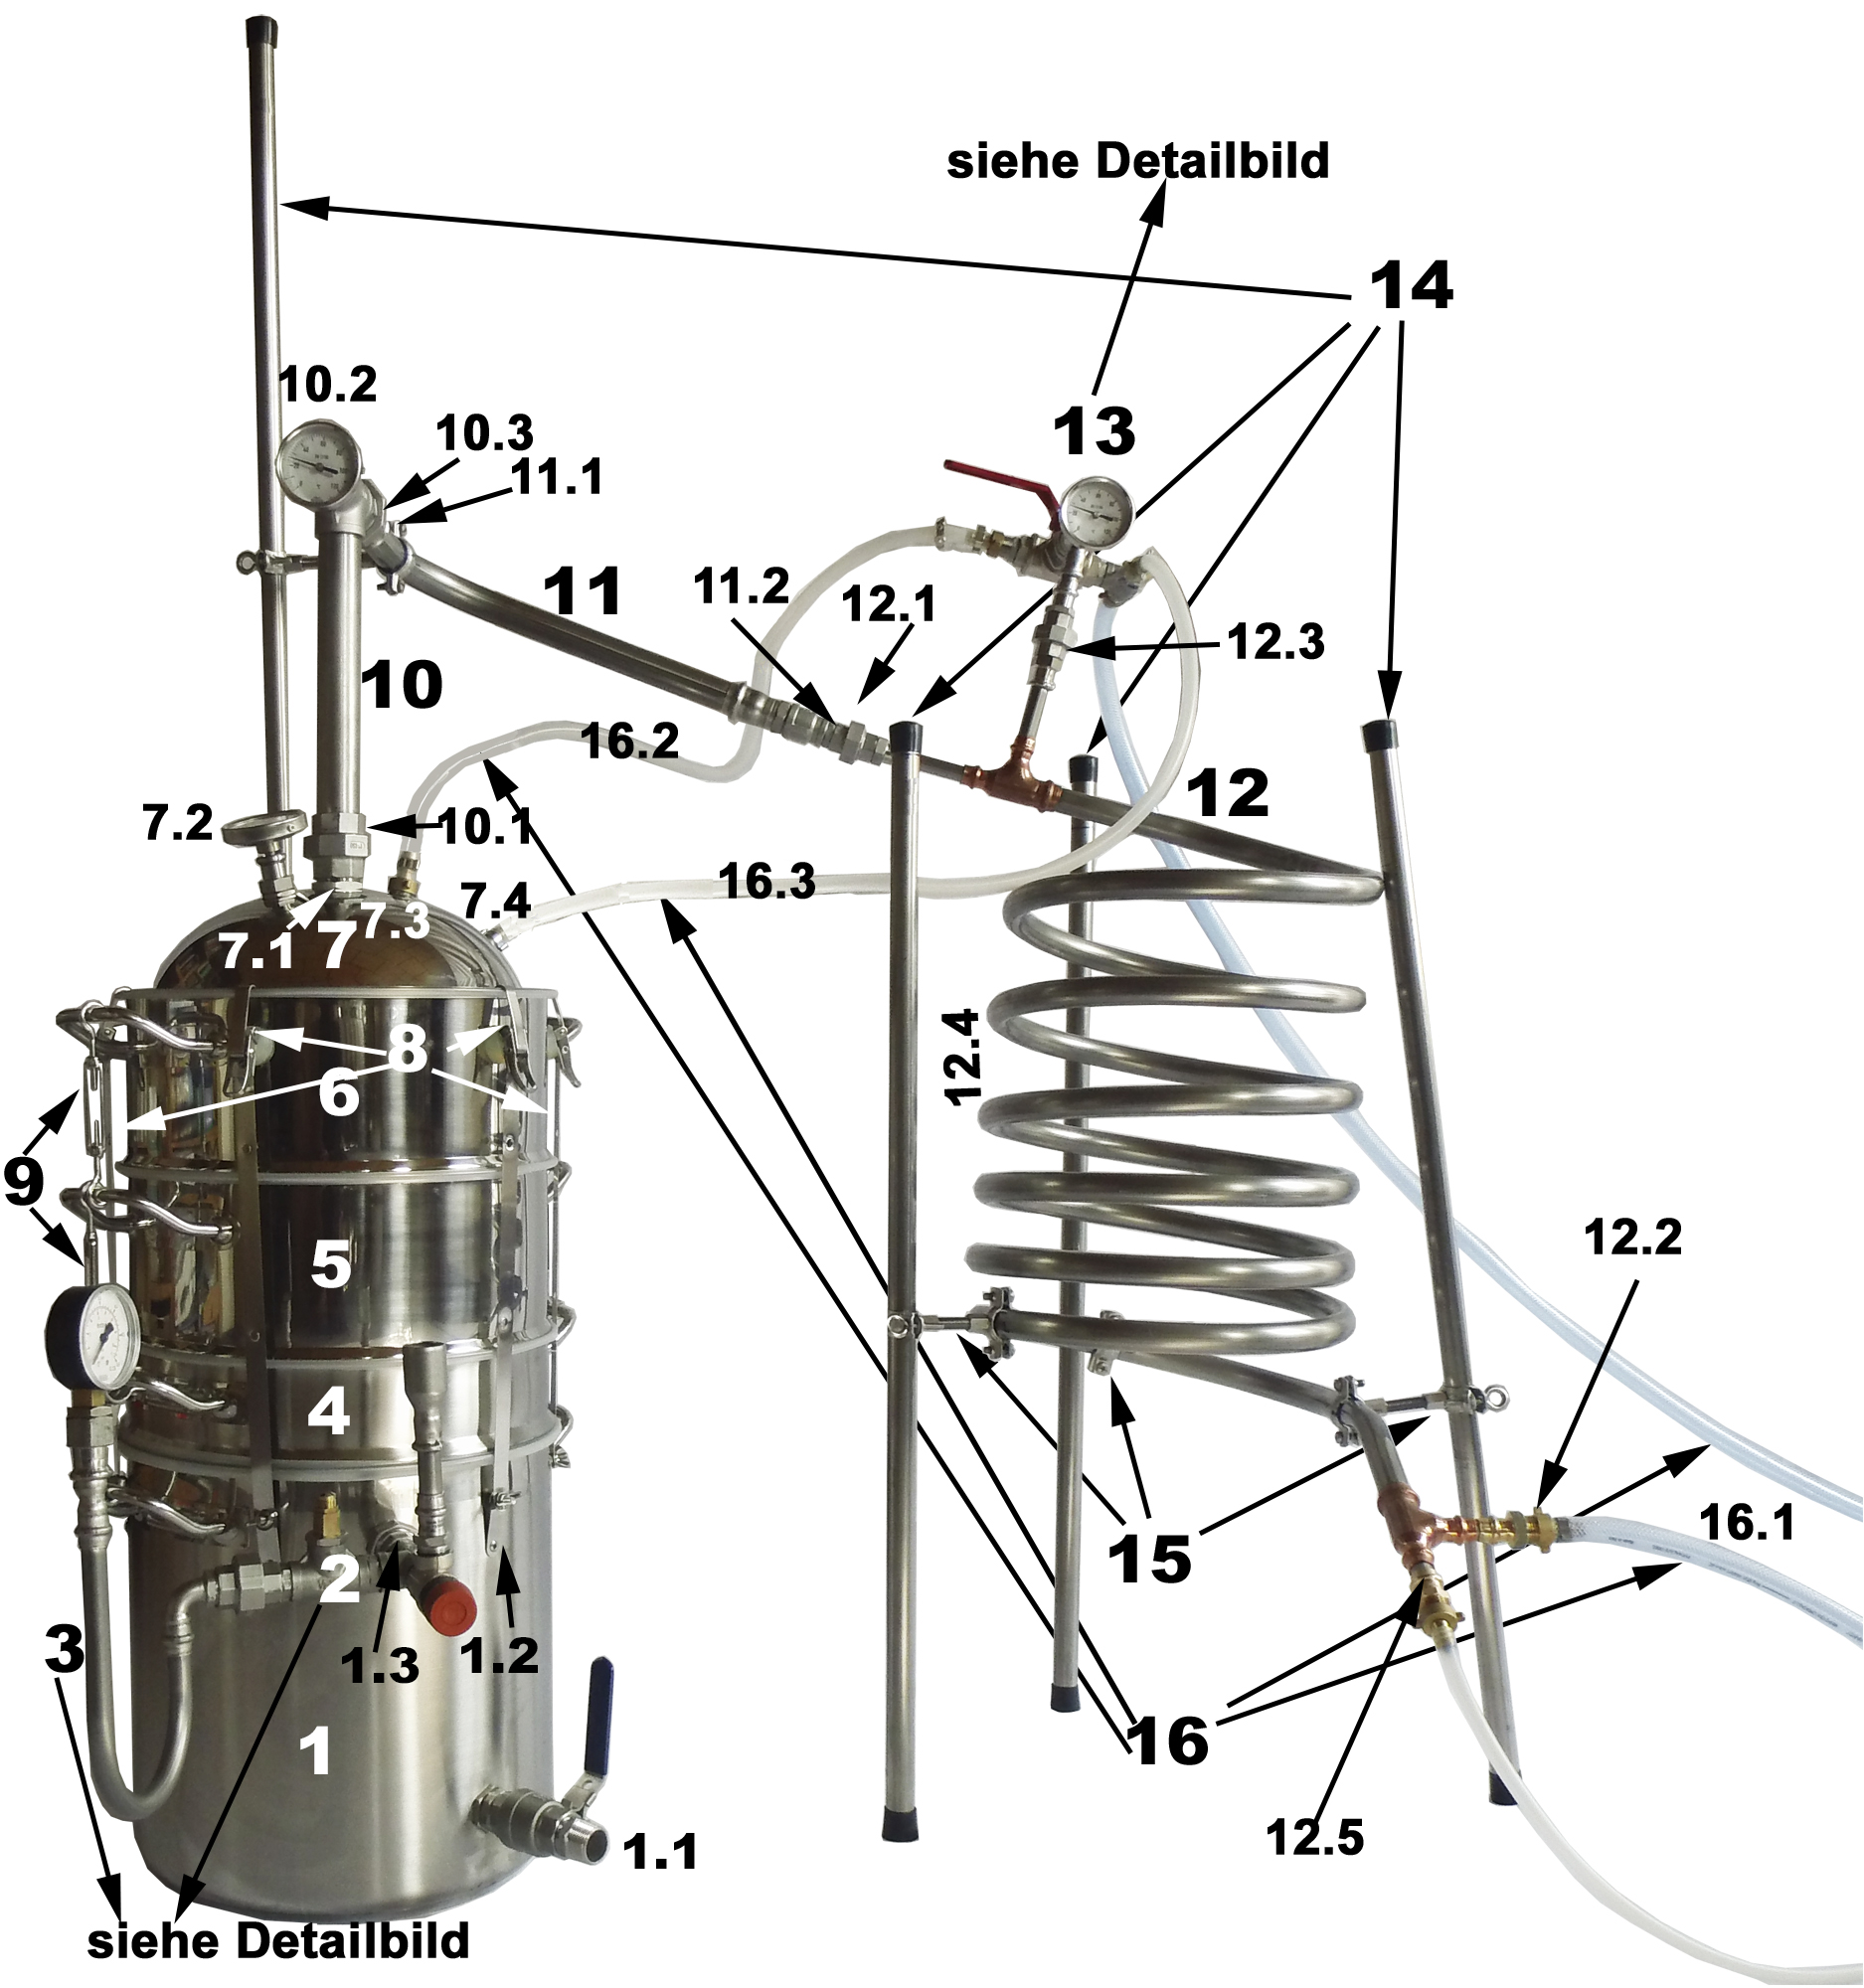
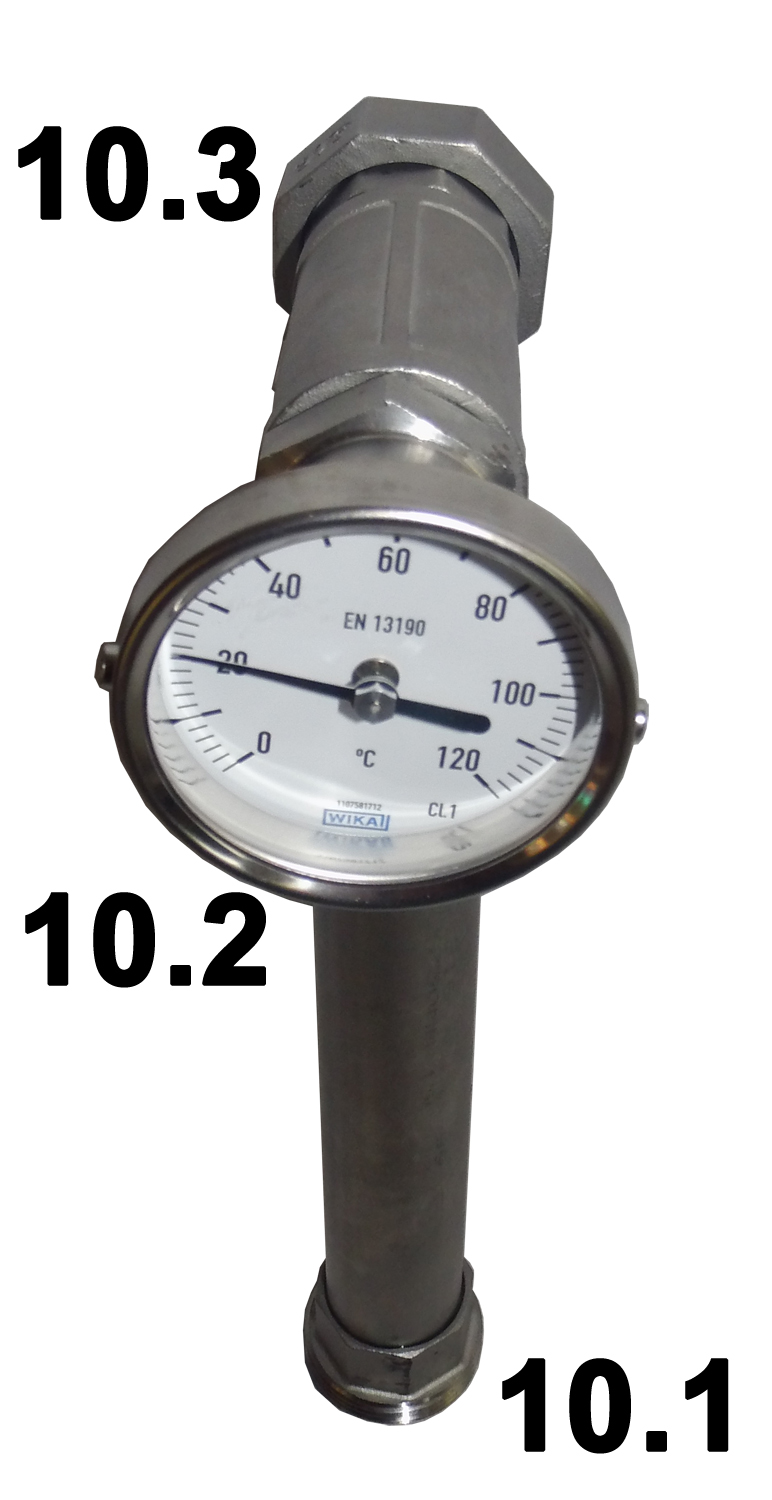
Connection module with riser system and thermometer
-
1 "threaded nipple for screwing on the helmet.
-
Stainless steel analogue thermometer of high quality for the measurement of the distillation temperature. The thermometer has the accuracy class 1.
-
Connection fitting for the spirit tube (11).
-
-
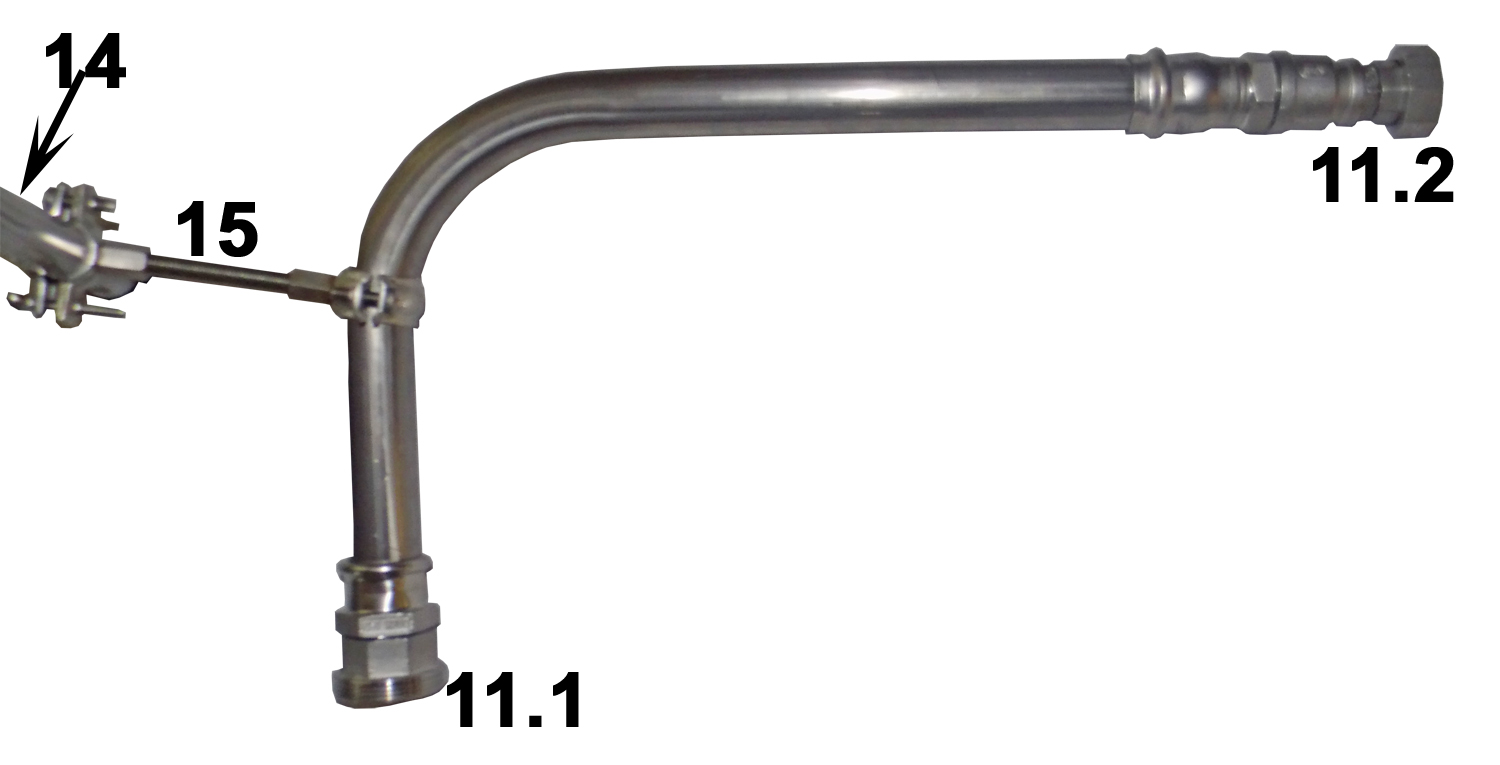
Spirit Tube Bridge
Visible in the image, the fastening cross sleeve 15 for the tripod leg 14.-
1" screw nipple for screwing to 10.3,
-
½ "screw connection for connecting the cooling module to 12.1.
-
-
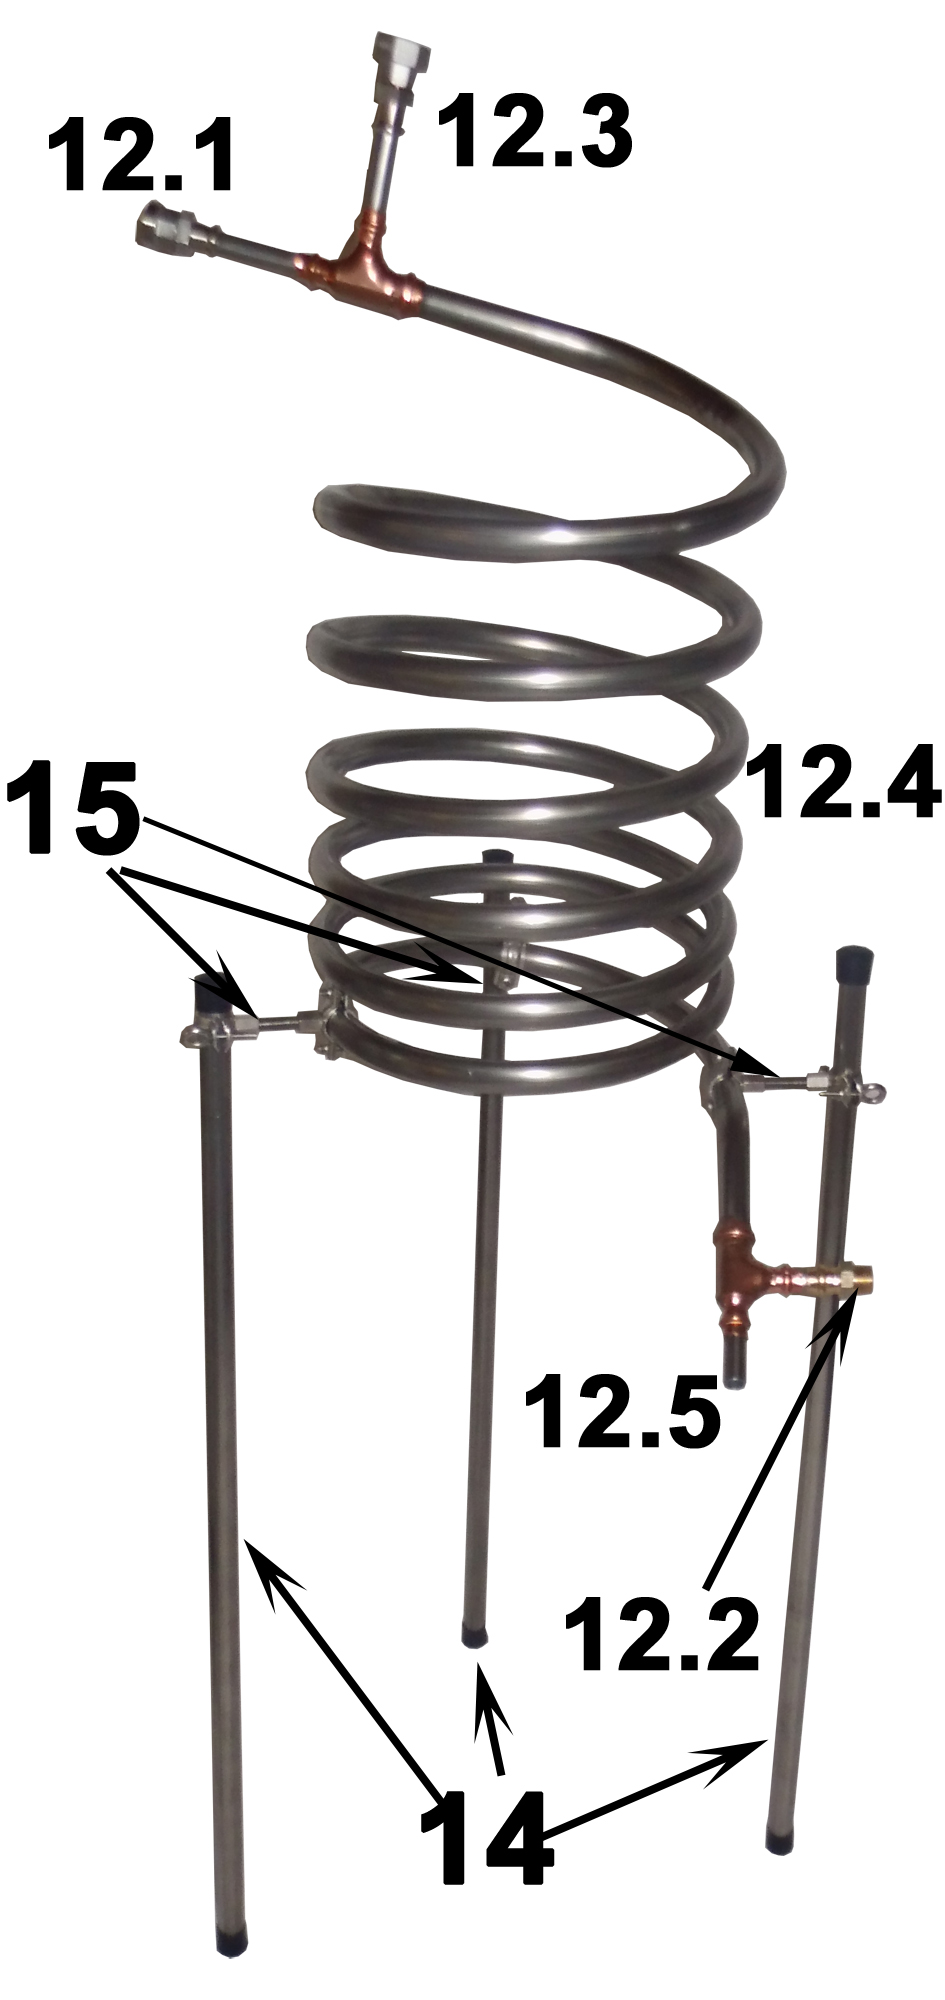
High performance countercurrent cooler, 6 m stretched length
-
Screw nipple for screwing to 11.3.
-
Cooling water inlet,
-
Process water outlet to the dephlegmator with connection nipple for the hose 16.2 with pinch cock for fine adjustment.
-
6 m spiral double tube, soul inside for the distillate and outer coat. Between soul and mantle, the cooling water of the distillate flow direction runs upwards to the process water outlet 12.3.
-
Distillate outlet. Here the distillate line 16.4 can be plugged.
-
-
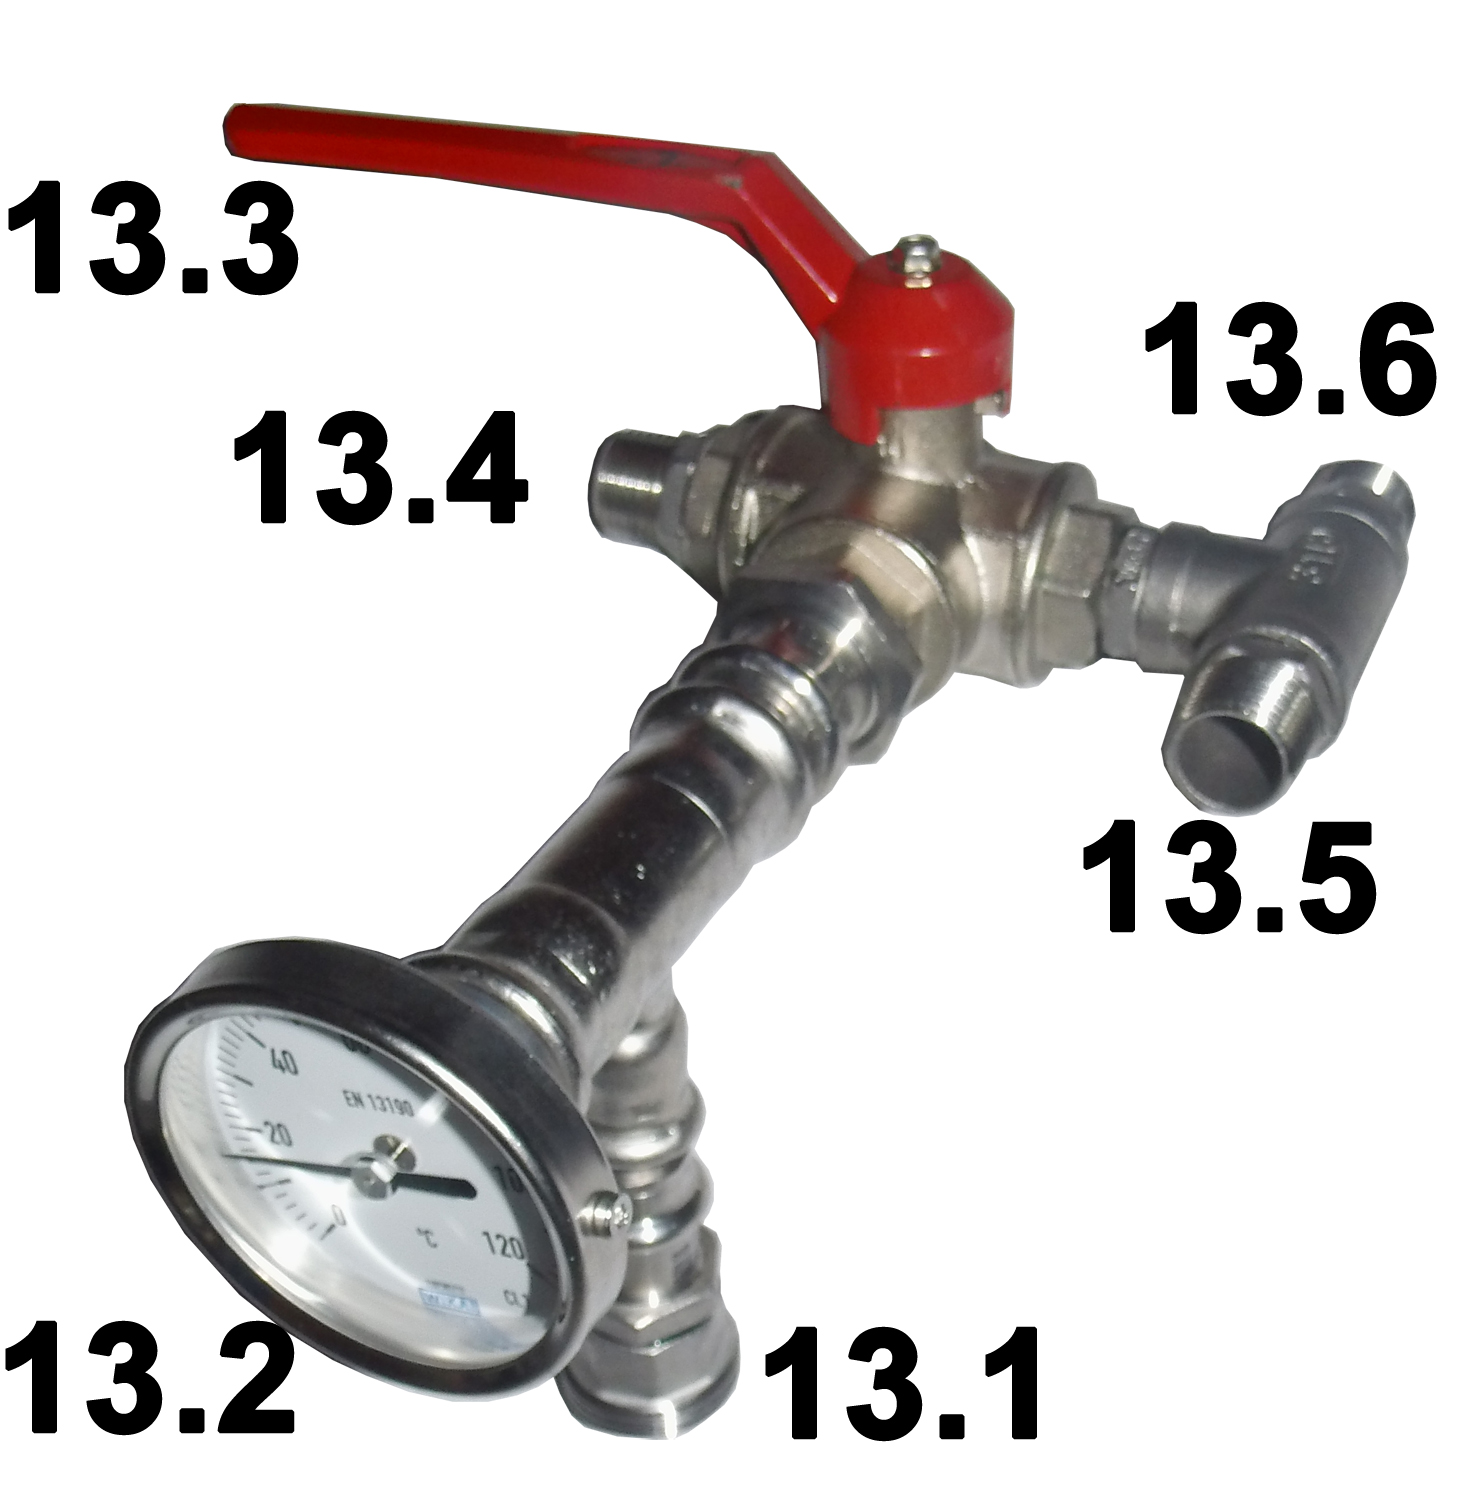
Process water module for water supply of the dephlegmator
-
Screw nipple for connection to 12.3,
-
High quality stainless steel analog thermometer for the measurement of dephlegmatist temperature. The thermometer has the accuracy class 1.
-
Shifter Dephlegmator on / off. When the lever is in the picture, the dephlegmator is switched on.
-
Process water outlet to the dephlegmator with connection nipple for the hose 16.2.
-
Wastewater inlet from the dephlegmator with connection nipple for the hose 16.3.
-
Connection for one of the hoses 16.1 for wastewater discharge.
-
-
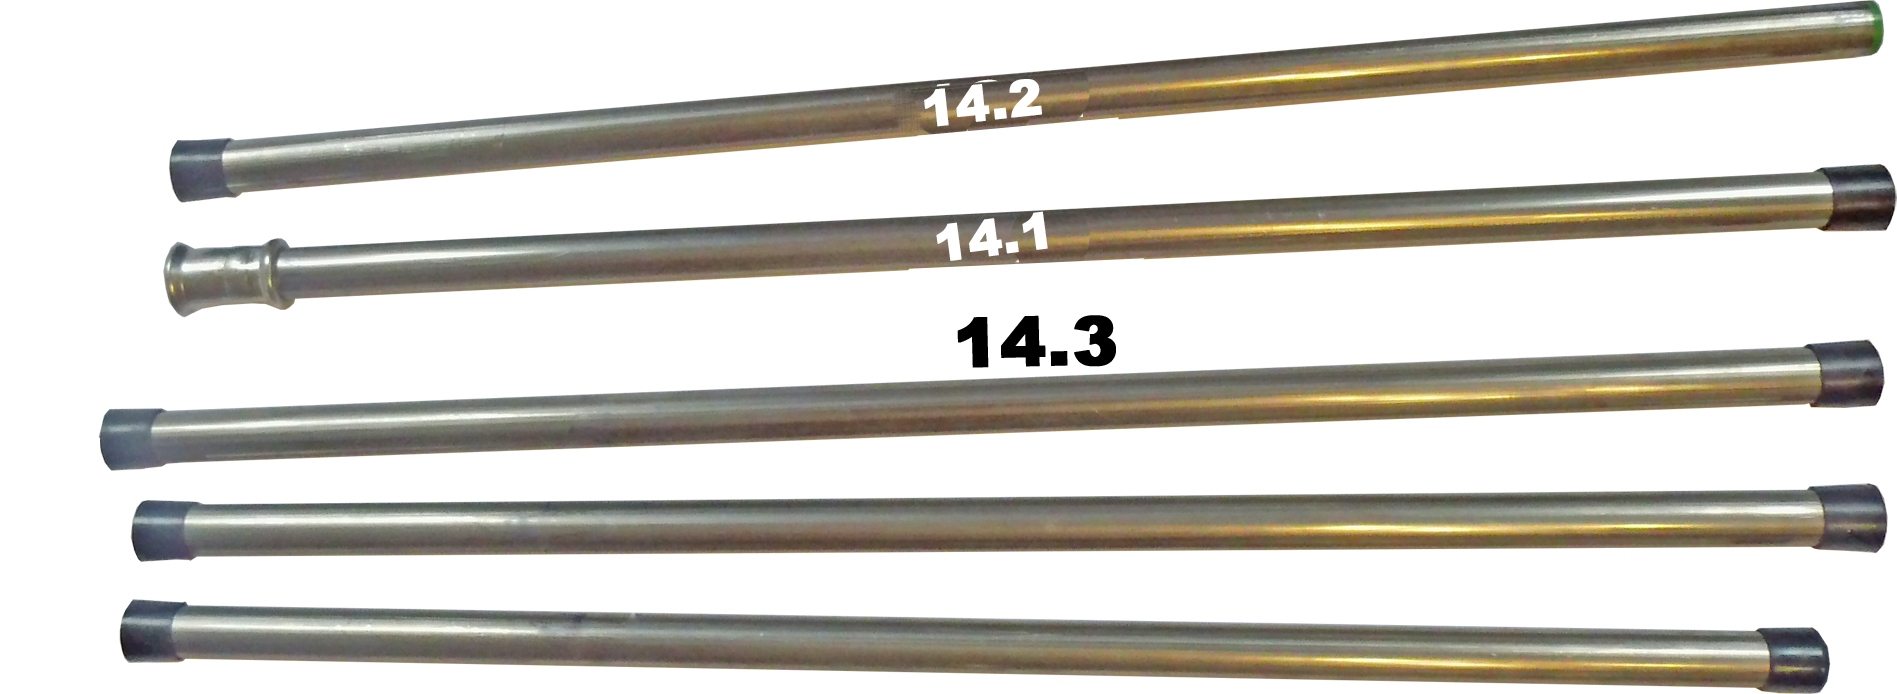
Stainless steel support rods for rebuilding the pipe system
-
Lower part of the stand tube for holding 11.
-
Upper part of the stand tube for holding 11. insert into the socket of 14.1.3 .
-
support rods for mounting the cooling module 12.
-
-
4 stainless steel cross-joints for attaching the pipe system to the support rods


-
Tube Set
-
Water hoses for screwing to 12.2 (water supply) and 13.6 (water disposal.)
-
Connection of process water module (13.4) with dephlegmator input (7.3).
-
Derivation of dephlegmator water from 7.4 to 13.5.
-
Distillate pipe to attach to 12.5.
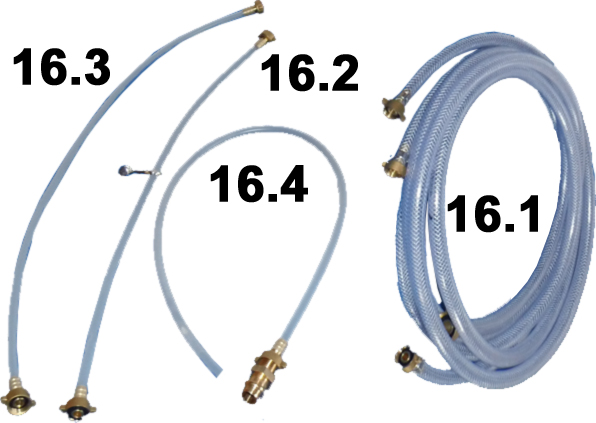
-
-
Stopper for the
-
Closing the water bath boiler,
-
Closing the manometer tube
-
Operation of the water bath distillery
This new type of distiller series is for friends of experimental distillation. The burning of mash, especially fruit mash with residual starch, is a thing of the past. Burn liquor, especially in the fruit distillery, can now be realized on a small scale without burning the mash with a pressure water bath still. This pressurized water still is operated with a maximum pressure of the water bath space of 0.15 bar. The temperature of the water bath is then about 103 ° C, so that the mash could be easily heated up to the boiling point of the water. In fact, one would work with lower pressure so that the distillation proceeds slowly and a quiet separation of the components is ensured. For safety reasons, an overpressure valve opens between 100 and 150 mBar so that the temperature of the water bath is limited to a maximum of 104 ° C.
Filling and closing
At the beginning of the kettle is filled through the opening 1.2 or the cock 1.1 with 9 liters of distilled water as possible and then screwed once the plug 17.1. It should be noted that the 2 provided for the cohesion of water and mash boiler turnbuckles 9.1 are sufficiently tight. Now the mash kettle can be filled with mash. Make sure there is enough liquid in the mash kettle. Although the mash can no longer burn, liquid is beneficial for effective heat dissipation in the kettle. If you want to fill out the column bottoms (columns as distillation pot widening), place one of the columns on the 90% filled mash kettle. To do this, either invert one of the seals over the edge of the mash kettle and then set up a column. Or, what improves the seal, down on the column, a profile seal is mounted so that the short lip of the seal runs approximately in the middle of the bead at the bottom of the column. The long lip runs below the bead. The column is then just put on and pressed evenly. Subsequently, a turnbuckle (9) must be hooked and clamped over the handles of the mash pot and the column on each side. When attached column is now filled by the column sieve to a maximum of 2 cm below the edge. Should a leak be noticed, the turnbuckles should be tightened slightly. Since the column is still about 2 cm immersed in the casserole, should not be more than 18 liters in the mash kettle when placing the column. The capacity of the still is therefore not the sum of the volumes of pot and columns 44.5 liters but about 2.5 liters less. With the column as a burning sacrificial extension, the system thus has a capacity of a maximum of 42 liters. One has to take into account when filling that the mash still expands when heated and possibly also foams. You should always be below the maximum capacity when filling. If Siebtöpfe are operated as a column, they must remain free. Below the sieve bottom of the 1st column, at least 2 cm must remain between the liquid surface and the sieve bottom so that vapor formation between the liquid surface and the sieve is still possible.
Depending on the application, the upper column can also be filled with fruits or herbs. If you only want to burn once, so do not want to create a raw blast and later fine firing, you should definitely leave the columns free in order to ensure a sufficient separation performance for pre-center and post-run. The use of turnbuckles between mash kettle and 1st column and between 1st and 2nd column is not necessary in this case, because after closing the system with the clamping locks, the system is sufficiently dense. Finally, a seal is placed over the edge of the upper column and the lid placed. Then the stainless steel snap fasteners are hooked over the lid edge of the burn pot and clamped with the lever.
Now the cooler module can be screwed on and the water hoses connected. Then the safety modules are screwed on; first the module 2. The manometer tube 3.2 is now, if not already done as a heat buffer to protect the manometer filled with some water; then the module 3 is screwed to 2.5. The tube can then be flexibly rotated so that the pressure can be read conveniently
Further notes on construction and use
If you want to fill out over the bottom of the column (column as Destilliertopferweiterung), the column is placed on the 90% filled mash kettle. When using the turnbuckles, one of the seals can be pulled directly over the edge of the pot. But best of all, the profile seal is pulled up so that the short lip of the seal runs approximately in the middle of the bead on the column. The long lip runs below the bead. The system then seals without the turnbuckles. The column is then just put on and pressed evenly. Likewise, the second column is used. When attached column is now filled by the column sieve to a maximum of 2 cm below the edge. One has to take into account when filling that the mash still expands when heated and possibly also foams. One should therefore always be below the maximum capacity when filling. If the attachment is to be operated as a column, it must remain empty. Below the sieve bottom of the column, at least 2 cm must remain between the liquid surface and the sieve bottom so that vapor formation between the liquid surface and the sieve is still possible. Depending on the application, the column can also be filled with fruits or herbs. If you only want to distillate once, the column should remain free in any case, to ensure a sufficient separation performance for pre-medium and caster.
Finally, one of the profile seals is slipped over the edge of the column and the helmet is put on. Then the stainless steel snap fasteners are hooked over the lid edge of the burn
